Overview
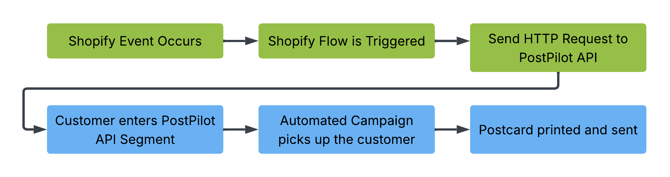
PostPilot's API-triggered campaigns let you send direct mail to customers by pushing their data to a PostPilot API endpoint. When a customer hits the endpoint, they enter a PostPilot segment, and any automated campaign targeting that segment sends them mail.
Shopify Flow can call these endpoints automatically whenever something happens in your store. This unlocks powerful use cases — like sending a thank-you postcard after a first purchase, a win-back card after a refund, or a VIP welcome when a customer reaches a new loyalty tier.
How it works:
What you need:
- A Shopify plan that includes Shopify Flow (Basic plan or higher)
- An active PostPilot account with API Connection enabled
- At least one automated PostPilot campaign targeting an API segment
Part 1: Set Up PostPilot
Step 1: Create an API Connection
- Log in to your PostPilot dashboard
- Navigate to Integrations → API Connection
- Click Manage on the API Connection card
- Select New Connection (or manage an existing one)
- Give the connection a name (e.g., "Shopify Flow")
- Your connection details page will display your unique endpoint URLs and example JSON payloads for each endpoint type
Important: If you regenerate your API URLs (e.g., for security reasons), all three endpoint URLs change at once. You'll need to update them in every Shopify Flow workflow that references them.
Step 2: Choose Your Endpoint
PostPilot provides three API endpoints for different use cases:
| Endpoint | Use Case | What You Send |
|---|---|---|
| Shopify Customer Event | Customer already exists in Shopify (most common) | Email or Shopify customer ID |
| MailMatch via API | You only have the customer's email — PostPilot resolves it to a physical address | Email + full name |
| API Full Contact | You have the customer's complete mailing address | Full name + complete address |
For most Shopify merchants: Use the Shopify Customer Event endpoint. Since your customers already exist in Shopify and sync to PostPilot, you just need to pass their email or customer ID.
Your endpoint URLs will look like:
https://api.postpilot.com/v1/{your_connection_id}/shopify_customer_event
https://api.postpilot.com/v1/{your_connection_id}/api_email_contact
https://api.postpilot.com/v1/{your_connection_id}/api_full_contact
Step 3: Create a PostPilot Segment
You need a segment that collects contacts arriving via the API.
For Shopify Customer Event (recommended):
- Go to Segments → New Segment
- Choose a Shopify customer segment type
- Add filter: API Shopify customer event occurred (relative) → "on or after 2 days ago"
- Optionally add a filter on
custom_1to route different events to different campaigns - Save the segment
For MailMatch via API:
- Go to Segments → New Segment
- Select API Contacts with Email as the target
- Add filter: Contact updated date (relative) → "on or after 2 days ago"
- Save the segment
For Full Contact:
- Go to Segments → New Segment
- Select API Contacts with Address
- Optionally add a contact update date filter
- Save the segment
Tip: The "on or after X days ago" filter ensures only recently-triggered contacts are in the active segment. Adjust the window based on your campaign's send cadence.
Step 4: Create and Launch an Automated Campaign
- Create a new campaign targeting the segment you just built
- Design your postcard — you can use {{custom_1}}, {{custom_1}}, {{custom_1}} as dynamic personalization fields in the design
- Set the campaign to Automated so it continuously picks up new contacts entering the segment
- Launch the campaign
Part 2: Configure Shopify Flow
Step 1: Create a New Workflow
- In your Shopify admin, go to Settings → Flow
- Click Create workflow
- Click Select a trigger
Step 2: Choose a Trigger
Pick the Shopify event that should trigger a postcard:
| Trigger | Use Case | Example Campaign |
|---|---|---|
| Order created | Post-purchase thank you | "Thanks for your first order!" postcard |
| Order fulfilled | Follow-up after delivery | Upsell or review request card |
| Customer created | Welcome new customers | Welcome series postcard |
| Customer tags added | Segment-based targeting | VIP upgrade notification |
| Order cancelled | Win-back | "We'd love you back" with a discount |
| Refund created | Retention | Apology + offer to return |
| Subscription contract created | Welcome new subscribers | Subscription welcome card |
| Subscription billing attempt failed | Payment recovery | "Update your payment method" card |
Note: Shopify Flow can trigger on any event available in the Shopify ecosystem — including events from third-party apps like Recharge, Smile.IO, and others. If it can fire a Shopify Flow trigger, it can send a PostPilot postcard.
Step 3: Add Conditions (Optional but Recommended)
Click + after your trigger and select Condition to filter which events trigger mail:
- Only orders over $50: Order total price > 50
- Only US customers: Customer default address country = US
- Only first-time buyers: Customer orders count = 1
- Exclude tagged customers: Customer tags does not contain
no-mail - Specific product: Order line items product title contains [Product Name]
Step 4: Add the "Send HTTP Request" Action
- Click + after your trigger (or condition) and select Action
- Choose Send HTTP request
- Configure:
| Field | Value |
|---|---|
| HTTP method | POST |
| URL | Your PostPilot endpoint URL from Part 1 |
| Headers | Key: Content-Type Value: application/json |
| Body | JSON payload with customer data (see Part 3) |
Security tip: Store your endpoint URL as a Shopify Flow secret. Go to Workflow settings → Secrets → Add secret, name it
postpilot_url, and paste the URL. Then reference it in the URL field as. This keeps your API connection ID encrypted and out of workflow logs.
Step 5: Turn On the Workflow
Review your settings and click Turn on workflow.
Part 3: JSON Payload Templates
Shopify Customer Event (Recommended)
The simplest option — pass an email or customer ID and PostPilot looks up the rest from your synced Shopify data.
From an "Order created" trigger:
{
  "email": "",
  "customer_id": ""
}
With custom fields for personalization or routing:
{
  "email": "",
  "customer_id": "",
  "custom_1": "post-purchase",
  "custom_2": "",
  "custom_3": ""
}
From a "Customer created" trigger:
{
  "email": "",
  "customer_id": ""
}
From a "Customer tags added" trigger:
{
  "email": "",
  "customer_id": "",
  "custom_1": "vip"
}
MailMatch via API
Use when you want PostPilot to match an email address to a physical mailing address. Good for reaching customers even when you don't have their address on file.
Required fields: email and fullname
From an "Order created" trigger:
{
  "email": "",
  "fullname": " "
}
With custom fields:
{
  "email": "",
  "fullname": " ",
  "custom_1": "",
  "custom_2": "",
  "custom_3": ""
}
API Full Contact
Use when you want to pass the complete mailing address directly.
Required fields: email, firstname, lastname, line1, city, state, postal_code, country
Optional fields: reference_id, line2, custom_1, custom_2, custom_3
From an "Order created" trigger:
{
  "reference_id": "",
  "email": "",
  "fullname": " ",
  "firstname": "",
  "lastname": "",
  "line1": "",
  "line2": "",
  "city": "",
  "state": "",
  "postal_code": "",
  "country": "",
  "custom_1": "",
  "custom_2": "",
  "custom_3": ""
}
Subscription Triggers (Recharge via Shopify Flow)
If you use Recharge for subscriptions, Shopify Flow can detect subscription events and trigger PostPilot sends.
Subscription contract created (new subscriber welcome):
{
  "email": "",
  "fullname": " ",
  "custom_1": "subscription-welcome"
}
Subscription billing attempt succeeded (post-charge upsell):
{
  "email": "",
  "fullname": " ",
  "custom_1": "subscription-thankyou"
}
Recurring subscription order (Recharge processes the charge):
Use the "Order created" trigger with a condition: Order → App name = Recharge Subscriptions
{
  "email": "",
  "fullname": " ",
  "custom_1": "recharge-renewal"
}
Note: Shopify-native subscription triggers use camelCase (e.g., subscriptionContract.customer.email). Recharge app triggers use snake_case (e.g., charge.customer.email). Make sure you're using the right variable format for your trigger type.
Important: Shopify-native subscription triggers only work with Recharge on the Shopify Checkout Integration. If you're on legacy Recharge Checkout, you'll need to use Recharge app triggers instead.
Part 4: About Custom Fields
All three endpoints support custom_1, custom_2, and custom_3. Use them for:
Postcard Personalization
Pass a product name, coupon code, or customer attribute. Reference in your PostPilot postcard design to display the value dynamically.
Example: Send the order number and first product name so both print on the card:
{
  "email": "",
  "custom_1": "",
  "custom_2": ""
}
Your postcard could read: "Thanks for order ! We hope you love your ."
Segment Routing
Use custom field values to route contacts to different campaigns. Pass "custom_1": "vip" and create a segment filtering on custom_1 = "vip" to route VIP customers to a separate campaign — all through a single API connection.
Example: Branching by order value
Use Shopify Flow conditions to set different custom_1 values:
- If Order total price > 100 → Send HTTP request with
"custom_1": "vip-purchase" - Otherwise → Send HTTP request with
"custom_1": "standard-purchase"
Then in PostPilot, create two segments and two campaigns — VIP buyers get a premium thank-you card, standard buyers get a different design.
Useful Shopify Flow Variables for Custom Fields
- Order number:
→ e.g., #1042 - Order total:
→ e.g., 89.99 - Product title (first item):
→ e.g., Summer Starter Kit - Customer first name:
→ e.g., Sarah - Total orders placed:
→ e.g., 5 - Discount code used:
→ e.g., SAVE20
Custom Field Limits
- Three custom fields maximum:
custom_1,custom_2,custom_3 - String values only — numbers are fine, but they're treated as text
- Custom fields only work via the API (not available for CSV-uploaded campaigns)
- Keep values concise — they need to fit in the space allocated on the card design
- Only documented fields are accepted — any unrecognized fields (e.g.,
phone,tags) are silently ignored
Note: You don't place the template tags on the card yourself. Tell your PostPilot CSM what data you're sending in each custom field and where you want it on the card. Our design team will place
,, orin your postcard design. When the card prints, the actual value replaces the template tag.
Part 5: Testing Your Workflow
Step 1: Trigger a Test Event
- Place a test order (for "Order created")
- Create a test customer (for "Customer created")
- Add a tag to a test customer (for "Customer tags added")
Step 2: Verify in Shopify Flow
- Go to Settings → Flow → your workflow → Activity tab
- Confirm the run completed and the HTTP request returned a 200 status
Step 3: Verify in PostPilot
- Check the PostPilot segment — the test contact should appear
- Verify custom field values populated correctly
- Confirm the automated campaign is active and processing
Note: Contacts do not appear in segments immediately. The API sends data through a processing pipeline, and there may be a delay (minutes to hours) before the contact is queryable in the segment. If the contact doesn't appear right away, wait and check again.
Part 6: Common Workflow Examples
Post-Purchase Thank You Card
Trigger: Order created Condition: Order total > $50 AND Customer orders count = 1 AND Shipping country = US Endpoint: Shopify Customer Event
{
  "email": "",
  "customer_id": "",
  "custom_1": "thankyou"
}
PostPilot segment: Filter on API Shopify customer event + custom_1 = "thankyou"
VIP Welcome Postcard
Trigger: Customer tags added Condition: Added tag contains "VIP" Endpoint: Shopify Customer Event
{
  "email": "",
  "customer_id": "",
  "custom_1": "vip"
}
Win-Back After Refund
Trigger: Refund created Condition: Customer orders count > 1 Endpoint: MailMatch via API (reaches customers even without a stored address)
{
  "email": "",
  "fullname": " ",
  "custom_1": "winback"
}
Delayed Product Follow-Up (7 Days After Delivery)
Trigger: Order fulfilled Condition: Order line items product title contains "Starter Kit" Wait: 7 days (use Shopify Flow's Wait action) Endpoint: Shopify Customer Event
{
  "email": "",
  "customer_id": "",
  "custom_1": "starter-kit-followup"
}
Abandoned Checkout Second Touch
Trigger: Checkout abandoned (3 days after, if customer hasn't converted) Endpoint: MailMatch via API
{
  "email": "",
  "fullname": " ",
  "custom_1": "abandoned-checkout"
}
This is a use case no other direct mail platform can do easily. Abandoned checkout triggers typically only have an email address — no physical address. PostPilot's MailMatch resolves the email to a mailing address and sends a personalized offer with the product they left behind.
Subscription Welcome (via Recharge)
Trigger: Order created Condition: Order → App name = "Recharge Subscriptions" OR at least one line item has a Selling Plan ID Endpoint: MailMatch via API
{
  "email": "",
  "fullname": " ",
  "custom_1": "subscription-welcome"
}
Loyalty Tier Upgrade (via Smile.IO)
Smile.IO syncs VIP tier data as Shopify customer tags (e.g., smile-vip-gold). Use Shopify Flow to detect the tag change.
Trigger: Customer tags added Condition: Added tag contains smile-vip Endpoint: Shopify Customer Event
{
  "email": "",
  "customer_id": "",
  "custom_1": "Gold"
}
Use Shopify Flow conditions to branch by tier tag and set different custom_1 values for each tier (Gold, Silver, Bronze), so each tier gets a different postcard design and offer.
Part 7: Troubleshooting
| Issue | Likely Cause | Fix |
|---|---|---|
| HTTP 400 error | Malformed JSON or missing required fields | Check template syntax and ensure all required fields are included |
| HTTP 404 error | Wrong endpoint URL | Verify URL matches the API Connection page exactly |
| HTTP 401 error | API key was regenerated | Update the endpoint URL in all Shopify Flow workflows |
| 200 status but contact not in segment | Using wrong endpoint for segment type | Make sure your segment type matches the endpoint (e.g., Shopify Customer Event segment for shopify_customer_event endpoint, not api_full_contact) |
| Contact not appearing | Processing delay | Contacts don't appear instantly — allow minutes to hours for the processing pipeline |
| Postcard not sent | Campaign not automated or not active | Ensure campaign is set to Automated and is launched |
| Flow times out (30s) | Slow API response | Shopify Flow auto-retries on timeout; contact PostPilot if persistent |
| MailMatch not finding addresses | Email not in identity graph | MailMatch resolution depends on the email being associated with a known physical address. Not every email will resolve — this is expected |
Part 8: Tips & Best Practices
Use Custom Fields for Smart Routing
Instead of creating separate workflows for each campaign, use custom_1 to tag the event type. Then build PostPilot segments that filter on custom_1:
custom_1 = "post-purchase"→ thank you campaigncustom_1 = "vip"→ VIP welcome campaigncustom_1 = "winback"→ win-back campaign
One API connection, multiple campaigns.
Add Delays for Better Timing
Use Shopify Flow's Wait action to delay the API call:
- Thank you card: send immediately (no wait)
- Review request: wait 7 days after fulfillment
- Win-back: wait 14 days after cancellation
Protect Your API URL
Always store your PostPilot endpoint URL as a Shopify Flow secret (see Part 2, Step 4). This prevents the URL from appearing in workflow logs or being visible to staff who can view but shouldn't edit workflows.
Combine with Other Shopify Flow Actions
Chain actions in one workflow:
- Send PostPilot API request + tag the customer + send internal Slack notification
- Branch conditions to route different customers to different endpoints or campaigns
Rate Limits
PostPilot's API accepts up to 3,000 requests per 5 minutes. For most stores, this is more than enough. If you're running very high-volume events, consider adding a short delay or batching logic in your workflows.
Important Things to Know
- Only documented fields are accepted. Any unrecognized fields (e.g.,
phone,tags) are silently ignored — no error, no warning. Double-check your JSON keys match the field names listed in Part 3. - Contacts don't appear in segments instantly. There is processing time between when the API accepts your data and when the contact is queryable in a PostPilot segment. Allow time (minutes to hours) before expecting results.
- Shopify Customer Event requires a connected Shopify store. You can call the endpoint successfully, but you won't be able to create the matching segment type in PostPilot unless your store is connected.
- API key regeneration breaks all workflows immediately. If you regenerate your API key in PostPilot, all three endpoint URLs change at once. Every Shopify Flow workflow using the old key will start getting 401 errors with no grace period. Update all workflows immediately after regenerating.
- PostPilot retries are limited. If the PostPilot API is temporarily unavailable, Shopify Flow may retry the request automatically (standard Shopify behavior). However, there is no guaranteed replay or queue on the PostPilot side — if retries also fail, the event may be lost.
Quick Reference
| Item | Value |
|---|---|
| Shopify plan required | Basic or higher (Grow, Advanced, or Plus for advanced features) |
| PostPilot setup location | Integrations → API Connection → Manage |
| HTTP method | POST |
| Required header | Content-Type: application/json |
| Custom fields available | custom_1, custom_2, custom_3 |
| Shopify Flow timeout | 30 seconds (auto-retries on timeout) |
| API rate limit | 3,000 requests per 5 minutes |