Step 1:
Log in to your PostPilot account and click on Integrations from the left side navigation.

Step 2:
Under CSV Files, click on Manage.

Step 3:
Next click on New Upload to upload your file to PostPilot

Step 4:
You'll need to provide a unique tag to identify your customer list. Enter it into the appropriate field. The tag key will auto-populate below.

Step 5:
Next, select the file you'd like to upload by clicking Choose File. At this point you can drag and drop or select a file to upload.
Please note: The maximum number of rows that we allow in an upload is 50K. You should break up your file if it is larger than that.

Your file can contain the following fields:
First Name, Last Name or Fullname (Required)
Your CSV should include either a first and last name column, or a full name column.
The full name of the customer can be no longer than 40 characters. If both full name and company are provided, they will be printed on two separate lines above the rest of the address.
Note that either a name or company records is required by postal regulations for any mail recipient.
Company
The company of the customer. Must be no longer than 40 characters. If both full name and company are provided, they will be printed on two separate lines above the rest of the address.
Note that this field is required by postal regulations if the name of the customer is not provided.
Address 1 (Required)
The customer's mailing address. Must be no longer than 64 characters for US addresses or 200 characters for international addresses.
Address 2
An additional field for the customer's mailing address. Must be no longer than 64 characters for US addresses or 200 characters for international addresses.
City (Required)
The customer's city, town, or village.
State (Required)
The customer's region name. Typically a province, a state, or a prefecture. 'Required and must be a 2 letter state short-name code if country_code is US, 'otherwise optional and not any longer than 200 characters.
Postal Code (Required)
The customer’s postal code, also known as zip, postcode, Eircode, etc. Must follow the ZIP format of 12345 or ZIP+4 format of 12345-1234 if country_code is US, otherwise optional and not any longer than 40 characters. Due to common CSV postal code issues with leading zeros, if the country code is "US" we will add a leading 0 to any 4 digit postal code.
Country Code (Required)
The two-letter country code corresponding to the customer's country. Must be a 2 letter country short-name code. (ISO 3166)
Customer Id (Optional)
The unique identifier you have defined for the customer. (Max limit of 255 UTF-8 characters, and should not have trailing or leading spaces).
(If this column is not included in your upload, the system will automatically generate one for you.)
⚠️ Caution!
The use of customer ID is an advanced feature allowing subsequent CSV uploads to update customer records that were created by a previous CSV upload.
Unless you have a specific need for this, we recommend against including this column in your upload.
Order Count (Optional)
The number of orders associated with this customer.
Total Spent (Optional)
The total amount of money that the customer has spent across their order history.
Last Order Date (Optional)
The date when the customers last order was created in your system.
Last Order Total (Optional)
The final amount paid by the customer on their last order.
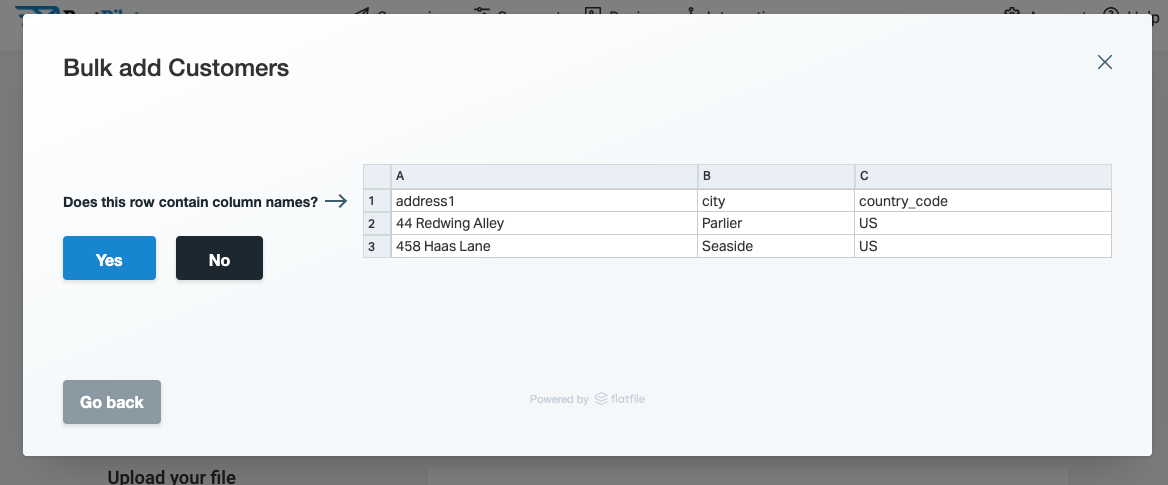
Step 6:
Tell us if your file has a header row by answering Yes or No.
Step 7:
The next step is for you to start matching your file's columns to PostPilot fields. Ensure that the selected column is mapped to the correct field. Click Confirm mapping for each field when complete. Then click on Continue when you are finished with the mapping section.

Step 8:
You'll then have an opportunity to correct any errors that we find before you submit.
Please note: PostPilot will try to auto format fields automatically for you to fix some common problems.
-
We attempt to format Countries into two digit codes
-
If a record is a US address we'll attempt to auto format States into two digit state codes
-
If a record is a US address we'll attempt to add leading zeros to 4 digit zipcode.
-
We'll attempt to parse dates and serialize them into iso 8601 format.

Step 9:
Once you have finished reviewing the rows in your file, you can then click Continue and then confirm that you are ready to submit your request.

Step 10:
After you click Yes to submit, your import will start to upload. Refresh the page to follow the progress of your upload.

Step 11:
It normally takes only a few moments to finish uploading your file to PostPilot, however larger files could take extra time to process.
When file processing is complete, click Create Segment from Upload to continue building your segment!
